
December 09 2021 – Lindsey Neill

HOW TO - Pattern Matching using Fineline Glue Tips!

Today I'm sharing a tutorial for pattern matching! This technique is especially useful when piecing the backing for a quilt. You can use this technique for pattern matching within a block or various other sewing projects as well!
For this method you'll need:
- Fineline Glue Tip + Elmer's Glue
- Water soluble pen or pencil (I'm using a Sewline Mechanical Pencil)
- Acrylic ruler
Save 15% on Fineline Glue Tips when you use the discount code HAPPYHOLIDAYS! Discount expires 12/15/21.
The first step is marking your 1/2" seam allowance on the wrong side of one of your pieces of fabric. Using an acrylic ruler and a water soluble pencil, mark two lines on the wrong side of your fabric. The first line is a 1/2" away from the raw edge of the fabric and the second is 1" away. If you want a 1/4" seam allowance, I recommend trimming the 1/2" seam allowance down after the two pieces have been sewn together.

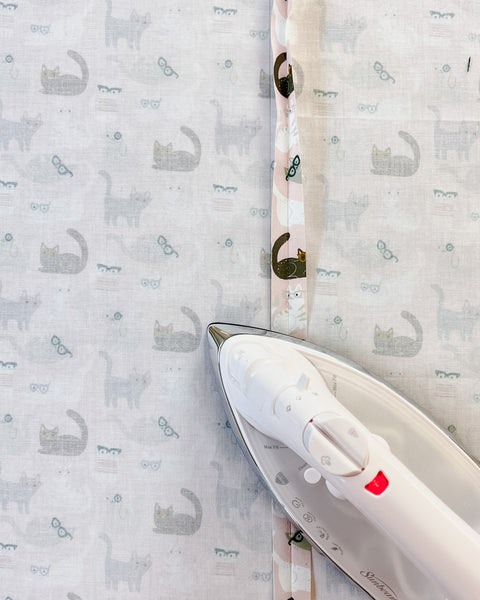
Next, with the marked fabric facing wrong side up, press the marked edge to meet the 1" marking on the fabric. It is important that the edge lines up exactly with the 1" marking on the fabric so take your time pressing for better accuracy.
The fold of the fabric should now line up exactly with the 1/2" marking made in the first step.

With both pieces of fabric right side up, match the pattern of the folded edge piece with the second piece of fabric. Working in small sections at a time, place a thin line of glue next to the folded edge and heat set (no steam!) in place. Repeat this process until the edge is completely glued down.


Flip the the folded edge fabric over so that the wrong side is facing up. The marked lines should be visible and the two pieces of fabric will now be right sides together. At this point, I like to use my iron to flatten the folded edge so it's easier to see the marked lines while sewing later.
Take your two glued pieces over to your sewing machine and sew on the 1/2" marking. Take your time to ensure you're as accurate with your sewn line as possible. I also like to use an open toe foot on my machine so I can see the 1/2" marking as clearly as possible.

Next you'll want to trim your seam allowance. I kept the 1/2" seam allowance and just trimmed along the raw edge of the marked fabric. If you're wanting a more narrow seam allowance, trim the desired width from the sewn line.

The last step is pressing your seam! I like to press my seam open, so I will gently pull apart the glued section of the seam allowance before pressing. It's important that you don't pull too hard or it can weaken the seam.
And voila! Perfect pattern matching!
Thanks for reading! For more ways to use Fineline Glue Tips check out our IG Live HERE!
0 comments