
March 27 2024 – Lindsey Neill

HOW TO - Printing Photos on Fabric
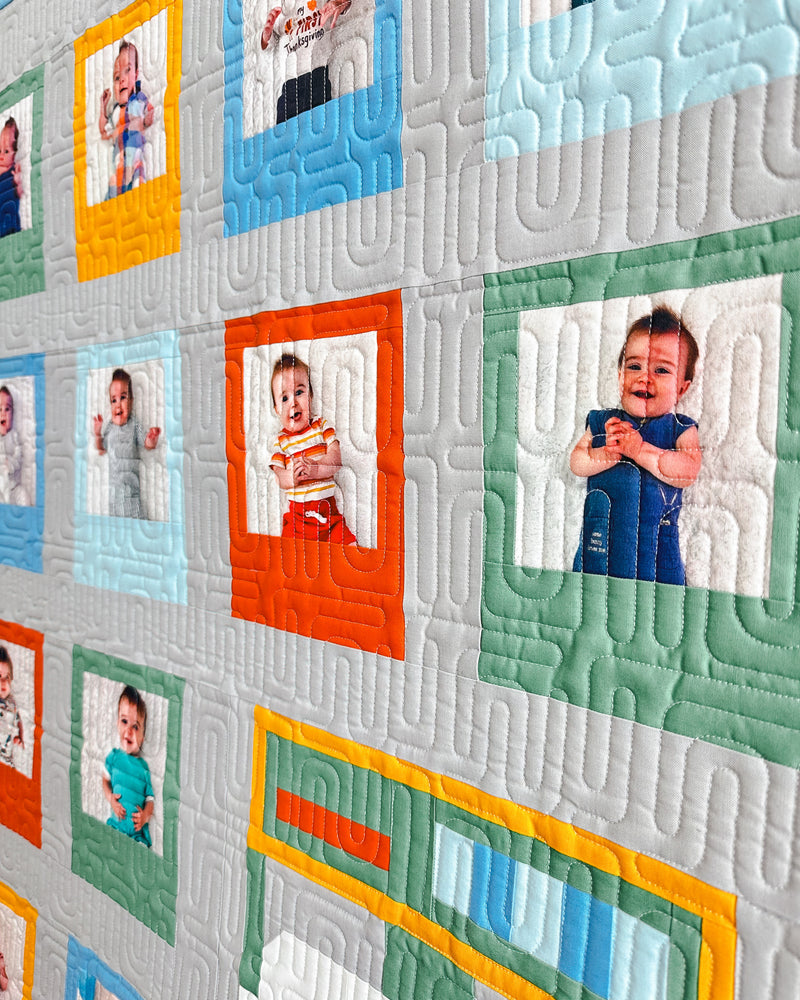
I'm releasing my upcoming pattern, Snap Happy, on April 12th! The pattern features a Polaroid camera block (14" x 17") that is surrounded by charm square friendly photo blocks (6" x 7 1/2"). The baby size from the pattern is pictured below.

Instead of using charm squares for the photo blocks in the baby version, I used charm square sized photos on fabric! Because the baby size Snap Happy quilt has 12 photo blocks, it's perfect for the monthly photos taken during a baby's first year. Speaking of, thank you to my friend, Haley, for letting me use her adorable son's first year photos for this sample! 💛

There are several options for getting photos printed on fabric. The option I'm giving a tutorial on today is using Adobe Photoshop. Don't have Photoshop? No worries! I'll share a couple other options at the very end of this post.

HOW TO PRINT PHOTOS ON FABRIC USING PHOTOSHOP
Something I recommend doing beforehand is cropping the photos you're printing so that they are square (1:1 ratio). This can be done with an app on your phone or in Photoshop. You'll resize the photos when adding them to the template (ie: make the photo smaller) so it's not necessary to do this beforehand.
If you're photo is under 750 x 750 pixels (or 5" square), you will have issues with the quality of the print/image on the fabric. It will appear grainy or not as sharp looking. Just something to keep in mind if that matters to you!
STEP 1: Download the Snap Happy Photo Template file HERE.
STEP 2: Open the template file in Adobe Photoshop. This is what the file should look like on your screen.

STEP 3: On the right hand side toward the bottom, select "Layer 1". Layer 1 represents the gray square in the top left corner of the template.

STEP 4: Open the folder with the photos you want printed. Make sure it's minimized so you can still see Photoshop on your screen.

STEP 5: Select one of the photos in the folder and drag and drop it over to the top left corner square.

STEP 6: After you release the mouse button, the picture should be layered on top of the gray square in the top left corner, but hidden underneath the other gray squares.
If your photo is larger than the gray square, use the cursor icon and drag one of the squares in the transform box (an example is circled in the yellow) until the photo is roughly the same size as the gray square. Release the mouse button to apply the transformation.

STEP 7: Select "Layer" and then "Create Clipping Mask". The photo should then embed itself into the Layer 1 gray square.

STEP 8: Repeat Steps 1 - 7 with the remaining 11 photos. Remember to select a new layer each time before adding a new photo. For example, you'll want to select "Layer 2" before dragging and dropping the second photo onto the template.
STEP 9: After all 12 photos have been embedded into the template, you'll need to save it as a PNG file. First select "File" and then select "Save a Copy...".

STEP 10: Save your photo as usual, making sure "PNG" is selected from the file type dropdown menu.

STEP 11: Then select "Large file size".

STEP 12: Now you'll want to login to your Spoonflower account. After logging in, select the person icon that's toward the top right of the screen. Then select "Upload a Design" from the dropdown menu.

STEP 13: A new window will open up where you can then upload the PNG file. In the first section, select the PNG file to upload. In the second section, select the box to aknowledge you're not using a copyrighted file/image. And then, finally, in the third section, select the "Upload" button.

STEP 14: A new window will open up showing the file you just uploaded. On the right hand side you'll want to select the options that are circled in yellow. You may want to use a different type of fabric than the "Petal Signature Cotton". That choice is completely up to you! Next you'll select "Save Changes" and, finally, select "Add to Cart". Check out like you normally would with an online purchase and that's it!
Sidenote: I ordered two fat quarters just to be safe and the quality of both exceeded my expectations. Spoonflower recommends not ironing on the printed images, but I have had no issues with it. Starch spray didn't affect the quality of the images either. But, even though I didn't have issues, I still recommend testing your printed fabric before starching and pressing directly on it!

ALTERNATE OPTIONS IF YOU DON'T HAVE PHOTOSHOP
1. CANVA - Spoonflower has a blog post that explains how you can upload photos to Canva and then upload the PNG Canva file to Spoonflower. P.S. If you go this route, a 5" square photo = 750 pixels. You can view the Spoonflower blog post HERE.
2. ETSY - There are many Etsy shops that will do all the work for you! A few shops I recommend are...
I hope you found this post helpful! If you have any questions, feel free to email me at PenAndPaperPatterns@gmail.com. And one last reminder, the Snap Happy pattern will be available on April 12th! Sign up for my newsletter HERE so you're first in the loop when it's available on my site. The discount code in the newsletter is a pretty great perk for subscribing as well 😉
1 comment
What a fantastic tutorial! I’ve been wanting to incorporate photos into my quilt projects, and this step-by-step guide using Photoshop is perfect. I love the idea of using photos for baby’s first-year milestones – such a great way to preserve memories in a quilt! I’ll definitely be giving this a try for my next project. Thanks for sharing!